Showing posts with label armour build. Show all posts

Sunday, March 13, 2011

Becoming Master Chief; Part 6

A.K.A. "Why Halfords should introduce a loyalty card scheme"

Another busy Saturday round Dads trying to get the helmet (a.k.a. that fucking bastard thing) completed. Last weekend saw major progress, as you may have read - the helmet is completely fibreglassed and a lot tidier now the initial batch of Davids p38 sealant has been sanded down.

This week has seen me ordering some more stuff, namely what will be worn underneath this own thing. After various recommendations, I've gone for underarmour stuff from Progear. But, enough of me thinking on how the expense of this project would have probably made it more straightforward (and just as cheap) for me to buy a finished costume, how's the project coming along?

Yesterday was the tidy up operation; to neaten up the sanding, cleaning up some of the messier areas and trying to get the thing to a reasonable state.

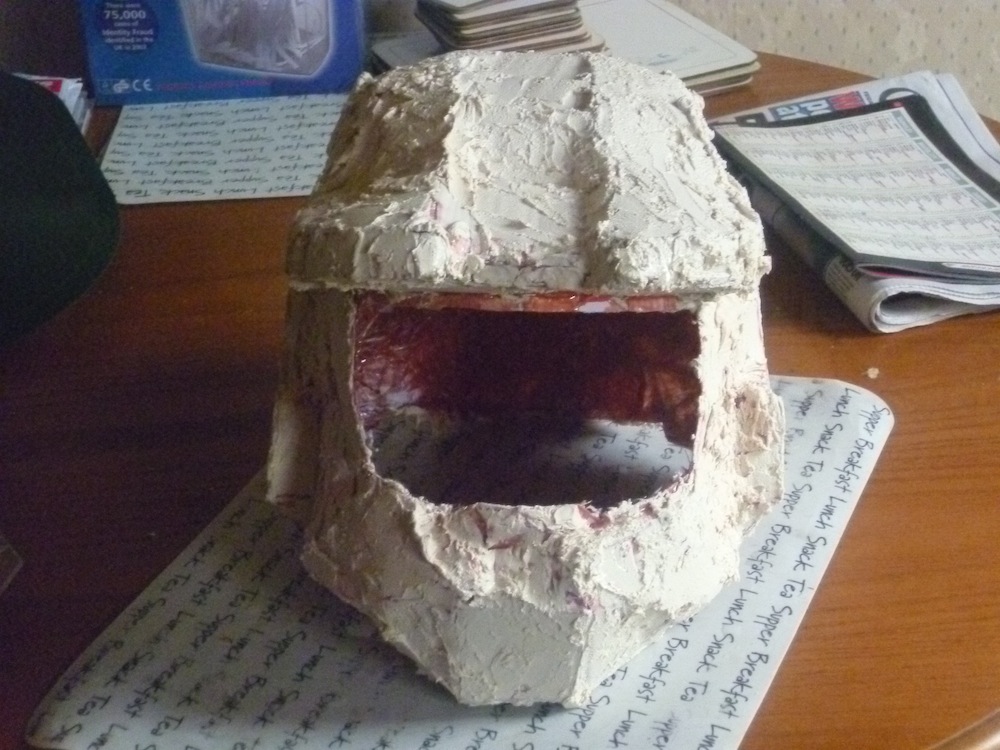
This is the helmet in the state it was in yesterday morning after a bit more sanding. The shape is definitely starting to appear, but it's still very messy. Certain edges aren't well enough defined and it's a complete mess around the edges of the visor. Even the precision of the dremel struggles to make neat lines - just seems to end up carving little trenches in everything.

On the plus side though, the helmet is rock solid. The combination of fibreglass and p38 means I could happily kick it around the garden and it wouldn't get damaged. It's fairly light too - getting lighter the more I sand away. It's strong even in the parts where I've sanded so much and the p38 is so thin you can see sunlight through the helmet. After many, many hours of sanding I decided to try the primer. As it's acrylic, it'll hide a lot of sins and cover all the elements where the sanding isn't 100%. I timed this bit perfectly as it started to tip down with rain and I didn't fancy lurking in the garage doing it. Some photographs were taken (click on the ones below for a bigger shot).

It's still not quite there; lots of detailing is needed with me carving some straight lines into it to break up the surface, and that visor area (despite being a lot smoother now) is still scruffy. But thats the aim for today; get some lines carved into it, tidy up the visor area and add some detailing. Then for the final paint job and weathering. Time will tell how much I have to report in the update I'll do later today.


Sunday, March 06, 2011

Becoming Master Chief; Part 5

Today was a whole day of Master Chiefery; Up bright and early this morning to go around to dads to spend the day in his garden working on it.  Luckily the weather remained good - this weekend is to concentrate on the helmet - I need to get a piece finished to give me the drive to finish the rest of the project.

Having done a tiny bit of fibreglassing inside the skull cap of it last Sunday (and having part fibreglassed a lower leg piece through the week) I spent a few hours fibreglassing the rest of the inside of the helmet - no need to do the outside.

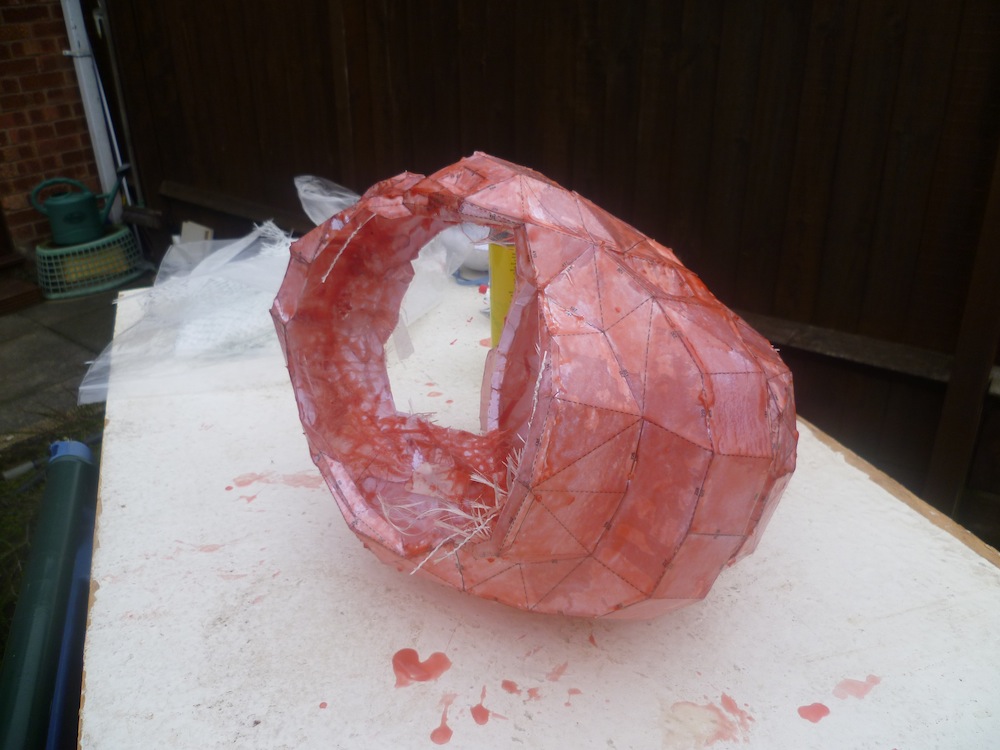
I've never worked with fibreglass before and it's flddly, yet effective.  For the bits where human hand simple can't touch and apply it accurately (inside the brow of the helm, for instance) I'm going to fill it with spray expanding foam.  It took a few hours (and a lot of mess) to get the entirety of the inside of the helmet covered with fibreglass and resin but it eventually cured and hardened to the point where I could hit the next stage.  Photographs from yesterdays efforts are below; At the end of the day I had a completely fibreglassed helmet coated with the exterior coated completely with p38.  Now just to sand it with Hand sender and Dremel for the details, which is the aim of Sunday.


Saturday, February 26, 2011

Becoming Master Chief; Part 4

For those of you who aren't bored of this yet (and those of you who are should be more than familiar with the 'Caution: Contain high levels of geek' sign by now, here's the latest update before I get on with laminating all the pieces made so far tomorrow (and fibreglassing them also for resilience).

Today was set aside for the helmet build which has been sitting as a box of various sized cut out pieces for a couple of days - or "laminating my helmet" as I explained it yesterday to Tom and Fran, which was met with much hilarity.

The helmet is ridiculously tricky and fiddly, which is why I was leaving it until last. However, as I've balled up several pieces with the jesmonite and have to make them again now, I thought I may as well do it now as I had a day free.

Several hours of Tara and I scoring, cutting out and folding bits that had either been stolen by the cats or had gone missing saw the structure beginning to form. Some photograph evidence is below. The more astute amongst you may have noticed that I can't actually see out of the helmet yet - the visor has to be built into the structure otherwise it would fall apart. Once the fibreglass is in the rest of the helmet and it's had another few coats of resin, the visor can be sawn out and replaced with the gold visor.


Thursday, February 24, 2011

Becoming Master Chief; Part 3

A quick update on the Master Chief Armour build, as this week has seem some highs and lows.

Even with accurate weights, Jesmonite is an absolute shit to use.  It hardens up an absolute treat within a very short period of time, but is almost impossible to use to laminate anything. The fact that it has a consistency of wallpaper paste (and a similar weight) means it's difficult to apply and warps the cardstock to a ridiculous extent.

Tuesday night (during which time Tara, Tom and Dad were at the football - SIMULBLOG ALERT) saw only bad results and was more than a little disappointing. Tara must have had enough of my moping for the remainder of that evening and most of the next day.  I was on the verge of giving up -

- but decided to take a different approach.  Going for the time honoured method the Americans seem to use for their pepakura, I've tried something else for the lamination.  Got some Davids Fibreglass resin and activator from Halfords and gave it a test today - worked like an absolute charm.  I've now resined a forearm piece which is completely waterproof and sturdy enough so I can use the jesmonite on the interior to seal in the fibreglass matting - giving it strength and meaning the jesmonite won't go to waste.

Just got the second piece in from outside - Wasn't quite generous enough with the activator so it took about half an hour longer to dry, but the laminate went on much easier second time round (It's the lower one of the two photographs) because I suspect I did a neater job on the clear acrylic paint I coated them with so they'd keep their shape and not get water logged.  Or more than likely, Tara did the second one and she's much neater than I am.


So, update 3 out of the way with some actual progress.  Next stage is to Jesmonite the interior of those two pieces, and then relaminate with the resin to stick the fibre glass matting in.  It might not seem like much progress, but trying to laminate with the jesmonite was fucking me up a right treat - the resin was an absolute godsend.

Sunday, February 20, 2011

Becoming Master Chief; Part 2

A quick one, this - just by means of a progress update.

So, it's one week since the "Master Chief" project began. 7 days of intensive scaling, printing, cutting out, scoring and gluing. There have been a few disasters along the way, namely having to do the two thigh pieces again - they were completely the wrong size and I'd have ended up looking a fat thighed green robot. We've had a neat little production line going in the house, I'd do the cutting, Tara would do the scoring and folding and hand them to me for assembly with my handy (and invaluable) glue gun.

The majority of the pieces were fairly straightforward and not too fiddly, but the backpack was an absolute shit. Gluing tabs less than 2 mm across to a tab the same size is a bugger to get right, and it's taken as long to make the backpack as half of the rest of the bits all together.

So, the next step begins at my dads (who has a garage and therefore the necessary space and ventilation to get it done) with the laminating of the pieces. I've got my box of resin ready on standby ordered from the lovely people at Creative Resources who, it must be said, have demonstrated an incredible level of customer service. My first communication with them was an email whereby I was checking that, as a complete newcomer to this, that I was actually ordering the right thing. A response came less than five minutes later with not only the answer I wanted, but a youtube video telling me exactly how to mix and apply the material I was ordering. I went for a starter pack containing the resin and several metres of different strength fibreglass matting for the all important step after this - strengthening the insides by laminating the fibreglass into the structure.  Photographs of backpack and some more bits below - click on the photographs to embiggen them.


Only the helmet remains to be built, but thats pointless until I get hold of a motorcycle helmet so I know how big it needs to be.  This whole project also gave me a legitimate reason to buy a Nerf gun to paint and modify as well, but that's a post for another day.  Over and out.

EDIT: Back from Dads where we experimented with the Jesmonite resin - Realisation: Without accurate measuring scales, resin comes out like wallpaper paste and becomes impossible to paint with after, ooh about eighteen seconds.  Electronic weighing scales prepped and ready for next weeks actual attempt :)

Tuesday, February 15, 2011

My name is David Court and I am a geek.

Fuck it.  I'm admitting what all of you must have known for years.  After an age of being all defensive about every single thing I've done that could be considered "geeky" and laughing at geeks and their funny ways to make myself feel smugly superior, I can't live a lie any more.  I'm as geeky as they come.  Going to a science fiction convention merely reinforced this in my mind, and I've now taken that final step towards über-geek.

I'm building a suit of armour (+8 Geek Points).
I'm making it out of cardboard (+12 Geek Points).
It's a suit of Master Chief Mjolnir armour (+24 Geek Points; Level Up)

Inspired by a phenomenal Master Chief costume I saw at the SFX Weekender and finding out that the price to purchase said costume is way out of my reach (and because I have some time on my hands), I've been investigating cheaper ways of producing the same effect - and to give my creativity a bit of a spin, which is something I don't get much opportunity for these days.

Following a couple of links on the internet I discovered the art of Pepakura and some of the incredible things that have been done with it by the helpful guys at the 405th, who are a community of papercraft armour makers (and an invaluable resource, it would appear).

The process is fairly straightforward; Pretty much every piece of science fiction armour you can think it is available as .PDO files (Not Ian Huntley, thats a different type of PDO file altogether).  These are designs to be printed on thick cardstock, printed out, cut out and folded - and then assembled together with a handy glue gun.

Remembering to scale down the images before printing them (Master Chief is, after all, eight feet tall, so building the armour to his scale would make it rather baggy, to say the least), each segment is an incredible undertaking.  The simplest designs (a simple panel for the back of a glove) may take a single sheet of card, the combat vest takes up around 20 sheets.

The scoring alone to make the folds work is a lengthy process, making mountain or valley folds depending on the instructions given.

Assembly again is a fiddly process with some of the attachment tabs being only 5mm across. A lot of molten glue is used, fingers are burned (and fingerprints erased, crime fans) and loud vocal cursing is done - until eventually, the thing begins to take shape and the structure is formed.

The next stage is the laminating (for which the materials have been duly ordered and I'm awaiting delivery). The structure needs to be sealed with resin and, once dry, strips of fibreglass matting need to be sealed with another level of resin around the inside of the structure to keep it solid and durable. The next step is the most laborious; The type of putty used to seal holes in car bodywork needs to be applied to the outside of the structure because this is where the detailing will go. The next stage is to spraypaint the assembled piece with primer, and then with black, and then the interesting bit begins whereby you paint the finished structure the way you want it and add detailing, weathering, damage, etc.

The finished result can be incredible - look at the 405th website for some examples of pepakura armour - but, by jingo, it's a lengthy mission. I started work proper on the project Sunday and have currently made the paperwork structures for four parts of the armour; The Pelvis, Left and Right boot and a Left Thigh Piece. And more importantly, they all fit.

And even more importantly, I've spared you the photograph of me trying on the pelvis; A.K.A. My Master Chief Pants.

Thanks to the help of my lovely assistant Tara (whose cutting out, patience and folding skills are exemplary) we're going great guns at the moment. Another week or so and I should have the majority of components created (only another 11 to go - sadly these include the helmet and Backpack which in themselves will take weeks of work) but the laminating and fibreglassing process on the bits that have already been made can begin as soon as the materials arrive.

Why am I telling you this? Why am I facing the very really possibility of some of you, my friends, disowning me? Why am I setting myself up for the great shame of admitting carrying out this activity which surely puts me in the higher echelon of Geekdom? Well, for one, I have a notorious habit of getting very bored very quickly with any projects that'll take me longer than a week - so putting progress on here is a good way to keep me enthused and hopefully see it through to the finish - and it's as good a thing to blog about as anything.  And in my heart of hearts I'm hoping that our love will see us though - It's stronger than this.

What am I making it for? Despite the fact I'm making it in my size I don't plan on wandering the streets of Coventry with it on. Hell, there are certain places in our city centre I wouldn't fancy even if it were real Master Chief armour. Ultimately, it'll probably just sit on a shopkeepers dummy as a display piece - although it might well get an airing at the next SFX Weekender in 2012. If the bloody thing is finished by then.

So, there we have it - out in the open. My card(stock)s on the table. Hopefully I'll post progress with this later - if I don't you'll know I've gotten bored of the project and the huge task ahead - but I'll do you a favour and mark every post with the 'Contains high level of Geek' warning at the top so if it doesn't interest you, you can simply ignore it and wait for my next instalment of Charlie Brooker style rants about the next thing that irritates me.